7 Unity Tips for a Beginner 3D Artist
Unity can be quite tricky. Here are seven tips for Unity (plus a bonus one) that I have found very helpful when working on our VR project. Hopefully, these tips will make life a bit easier for you if you are just starting out.
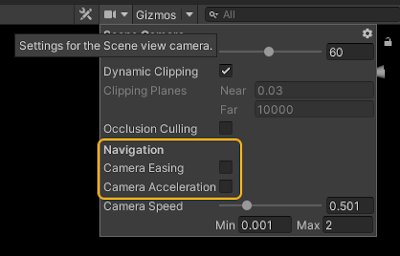
Camera easing and acceleration. These settings were turned on by default, but I find them quite annoying. Disable “Camera Easing” and “Camera Acceleration” for more responsive navigation, via the Settings for the Scene view camera. Then, in the scene view: click and hold the right mouse button and navigate with “WASD” + “Q” and “E”. Adjust your speed with the scroll wheel.
 |
| Camera Easing and Camera Acceleration. |
Snap to objects in the shaded wireframe mode. Placing objects in Unity can sometimes be a bit of a hassle. Use snapping to make it easier. Just hold “V” while the move tool is active, and then select a vertex on the object you want to move. I usually turn the scene lights off and also activate Shaded Wireframe mode.
 |
| Hold "V" to activate snap. |
Learn the basics of lighting with the URP, by Ciro Continisio. The video linked below should be obligatory for anyone who wants to understand lightbaking with the URP and the basics of the GPU lightmapper. Must watch! Link to the YouTube video.
 |
| From "Harnessing Light with URP and the GPU Lightmapper | Unite Now 2020" |
Use shadow casters to block unwanted light leaks. If your mesh has no thickness, then shadow casters can come in handy. Add a 3D Object: Cube → Set it to “Shadows Only”, in the Inspector under Lighting and use it to block the light. You can remove the collider.
 |
| The Shadow Caster blocks unwanted light leaks. |
Set box projection and adjust the intensity for reflection probes. When placing reflection probes in square rooms and corridors, you can try enabling “Box Projection” for a more accurate reflection. Adjust the Intensity as well until you are happy with the result. Oh, and by the way, reflection probes can overlap each other.
 |
| Adjust the Intensity and activate Box Projection. |
Create a terrain texture. Click on your terrain to edit it in the Inspector. With the “Paint Texture” brush selected, click on “Create…” to create a new terrain layer. Navigate to it and then click on your newly created layer to bring up its properties. Apply a Diffuse and Normal Map, preferably in the .png-format, and there you go.
 |
| Create a new terrain layer. |
 |
| Add a diffuse and normal map. |
Stabilize VR recordings with Oculus Mirror. If you are recording VR content you’ll notice tiny camera shakes in your videos. To get rid of those, there is a very handy tool available which is called Oculus Mirror. You will find it if you go to Program Files → Oculus → Support → oculus-diagnostics → OculusMirror.exe. Make sure to enable “Image Stabilization” and “Keep Upright”, if necessary. Try out the different profiles as some will result in black bars along the left and right sides. I use OBS Studio (free) to capture the recording.
 |
| Turn on "Image Stabilization" in the Oculus Mirror settings. |
BONUS TIP! Export .fbx-files from Blender with perfect rotation. Read this guide by poly nook! Basically, this is what you need to do:
1. Apply transform in Blender.
2. Use these settings in the .fbx exporter panel:
- Apply Scalings: FBX All
- Forward: -Y Forward
- Up: Z Up
- Use Space Transform: unchecked
3. In Unity, make sure “Bake Axis Conversion” is checked (in the model importer inspector window).
 |
| Export settings for .fbx files from Blender. |
I hope these tips are helpful to you and that you learned something new.
Join our Discord and share your own tips!
Join our mailing list for news, updates, and beta access!


Comments
Post a Comment