I've spent a lot of time wrapping my head around animation in Blender and understanding how to optimize and export animation from Blender to Unity. Without going into too much detail, here's a break-down of the steps I take and my learnings so far. I will say this, animation is hard. It's very hard. I do not consider myself an animator. If you have any feedback on my process, please share it with me.
⚠ WARNING ⚠
THIS IS NOT A TUTORIAL FOR ABSOLUTE BEGINNERS
💀 YOU HAVE BEEN WARNED 💀
I want to give a big shout-out to CGDive. The CGDive YouTube channel is a must watch if you're struggling with exporting animation to a game engine. His Blender add-on "Game Rig Tools" (GRT) is what has kept me sane when dealing with animation, and I highly recommend it. I will link a few videos and playlists to check out for more in-depth information (bottom of the page). The GRT add-on is part of my workflow, and though you can do it manually, save yourself the trouble and just get the addon.
Before you start, make sure that...
- …your character is facing forward (-y).
- …the feet are planted on the ground.
- …the pivot is in the bottom center of the mesh.
- …scale and rotation is applied.
- …the model is to scale.
- …the topology is good.
Basically we'll be creating two rigs, a control rig and a game rig. The control rig is what you will animate and the game rig will be what you export (which will be optimized for a game engine).
Part I: Create a Control Rig
- Create a rig of any sort (this is your control rig). This could be done manually or, for example, with Rigify. There are many tutorials for this on YouTube if you are not sure of how to do it, but basically you add an armature, extrude bones, parent those bones, create IK-chains, align the bones, and symmetrize if needed. See link in the resources section at the bottom for CGDive's manual rigging approach.
- Make sure the mesh and the armature are placed at the world center.
- Select the mesh, then the control rig and parent With Automatic Weights.
- Make sure everything is working as intended by checking in pose mode.
- Name it "LookAtMeI'mRiggingControlRig" (or something else that makes more sense).
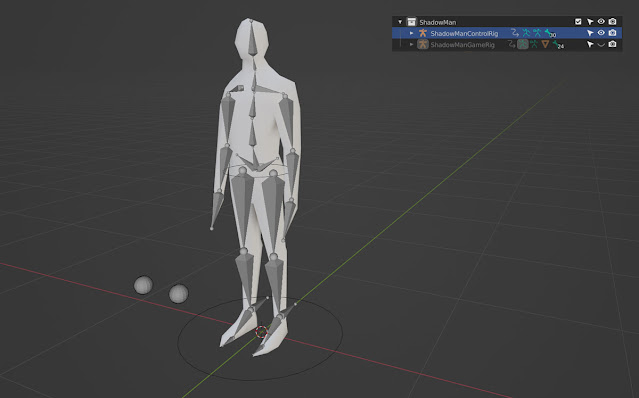 |
| The Shadow Man from our game LIMINAL PHASE with a control- and game rig (hidden). |
Part II: Generate a Game Rig with the GRT Add-on
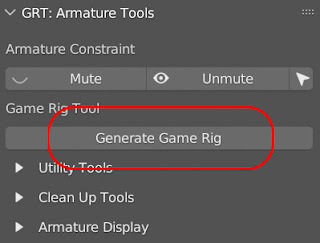 |
| It's as easy as clicking the button. |
Select the control rig in object mode and
generate the game rig with GRT.- Name it "LookAtMeI'mRiggingGameRig"
- Make sure all bones are parented correctly.
Part III: Weight Paint it
- Select the game rig in object mode, then select the mesh, switch to weight paint mode and Ctrl-click on a bone to start weight painting.
- Paint with the value set to Mix and adjust the Weight to either 0 or 1, depending on if you want to add or erase.
- Make extreme poses and adjust your weight painting if needed. Clear all transformations when done.
Part IIII: Animate it
- Position the timeline on "0" for Unity.
- Create an action and name it "CTRL_Asset_AnimationType". You can name it whatever you want, but make sure you use a prefix like "CTRL_" (for control rig).
- Animate the control rig and then push the action to the NLA. I'm aware that the previous sentence could be anything from a few minutes to days or perhaps weeks of work, but as this is not an animation tutorial, I will gently and respectfully move on...
Part V: Bake Animations with GRT
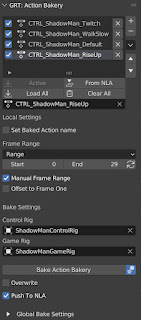 |
| Bake actions. |
Make sure that both the control rig and the game rig are visible.
- Add the actions that you want to bake in GRT's Action Bakery.
- Set the frames manually if needed, specify the rigs and check Push To NLA.
- Press Bake Action Bakery, choose Replace and set From: "CTRL_" and leave To: blank. Press OK.
- Test the actions. The constraints will be muted by default after you have baked the actions. Remember to turn these on in pose mode when you are going to animate. You can mute and unmute using the two buttons at the top after selecting the game rig.
- If you want to, you can create a default pose action for the game rig on frame 0 that has all transforms cleared. Set a keyframe, then push it down to the NLA.
Part VI: Export to Unity
- Make sure that the scale is applied and position the object at 0, 0, 0.
- Hide the control rig and make sure that the constraints are disabled before you export (muted).
- Select the armature, then the mesh/meshes and export an .fbx-file.
- Settings for exporting: check Selected objects, choose Armature and Mesh, disable: Add Leaf Bones, under Armature. Disable: All Actions, under Bake Animation. See link below for an in-depth article regarding this.
Part VII: Quick Setup in Unity
- Go with Animation Type: Generic, and pick Avatar Definition: Create From This Model.
- Create an Animator Controller and drop it on your asset.
- Go to the Animator window, drop animations from the .fbx-file and connect them.
Part VIII: Resources
CGDive



Comments
Post a Comment